oil based epoxy colored sand floor coating

Дом

oil based epoxy colored sand floor coating

  • Water-based Epoxy Colored Sand Floor Paint Styling Guide: Commercial (Shopping Malls/Cafés/Offices)
    Water-based Epoxy Colored Sand Floor Paint Styling Guide: Commercial (Shopping Malls/Cafés/Offices)
    Mar 02, 2026
    Commercial floors are more than just "ground"—they're an extension of your brand image. water-based epoxy colored sand floor paint, with its customizable texture and environmentally friendly properties, has become a popular choice for shopping malls, cafés, and offices. However, the needs of different commercial settings vary greatly—shopping malls need "eye-catching," cafés need "atmosphere," and offices need "practicality." Today, we'll share specific stylizing tips for each.  1. Shopping Malls and Stores: Attract Customers with "Differentiated Textures"  Core Requirements: Highlight the brand's style while withstanding the wear and tear of high foot traffic (thousands of people per day).  Styling Options:  Fast fashion stores (such as clothing and accessories stores): Choose 0.5mm fine sand, primarily in pure white or light gray. Pair with a highly reflective water-based topcoat (with a mirror effect in some areas) to enhance the space's brightness and highlight the product colors. Cultural and Creative Handmade Stores: Choose 1-1.5mm coarse sand in Morandi colors (such as grayish pink and light green). Preserve the original texture of the sand and pair it with wooden shelves to create a "handmade" feel that complements the merchandise. Entrance Area: Choose 1.5-2mm coarse sand (anti-slip coefficient ≥ 0.6) to prevent customers from slipping in rainy weather. A "brand logo inlay" design (using different colored sand colors to create a logo) can be used to enhance recognition.  2. Cafes: Create a check-in atmosphere with a "textured" feel  Core Need: Create a "photography" atmosphere while ensuring easy cleanup after coffee spills.  Matching Options: Industrial Cafes: Choose 2mm coarse sand in cement gray and dark brown to preserve the rough texture of the sand particles. Paint the walls with cement paint and pair them with wrought iron tables and chairs to create a "retro warehouse" atmosphere. Copper strips can be embedded in the floor to separate areas. For a Japanese-inspired, relaxing cafe: Choose 0.3mm fine sand, using off-white or light wood tones, paired with a matte finish. Use irregular color blocks (e.g., off-white + light brown) for the floor. Add rattan chairs and greenery to reduce the commercial feel.  Details: The floor under the bar can be treated with a splash-proof finish (two coats of water-based finish) to prevent coffee stains from seeping through the gaps in the sand.  3. Office: Balance practicality and simplicity to improve work efficiency  Core requirements: The floor should be quiet (no noise when walking), stain-resistant (avoid frequent cleaning that disrupts work), and maintain the clean aesthetic of the space.  Styling options:  Open office area: Choose 0.5mm fine sand, using light gray or light blue (low-saturation colors can reduce visual fatigue), paired with a matte finish. Keep the floor clean and uncluttered. Conference Room/Reception Area: Choose a medium-sized sand particle size of 0.8mm and a dark gray or navy blue color (for a formal look). Create "line dividers" (using a darker shade of the same color) on the floor to demarcate seating areas.  Painter Room: Choose a coarse sand particle size of 1mm and a light brown color (for stain resistance). Create a slight slope (0.5%) on the floor to prevent water accumulation and ensure a satisfactory anti-slip coefficient.
    ЧИТАТЬ ДАЛЕЕ
  • The Complete Water-based Epoxy Colored Sand Floor Paint Application Process: From Base to Inspection, Every Step Dedicated to "Details"
    The Complete Water-based Epoxy Colored Sand Floor Paint Application Process: From Base to Inspection, Every Step Dedicated to "Details"
    Mar 18, 2026
    "30% Materials, 70% Construction"—the ultimate effect of water-based epoxy colored sand floor paint depends not only on product quality but also on a standardized application process. Its water-based properties and colored sand particles, in particular, place high demands on the construction environment and handling techniques. Today, we'll take you directly to the construction site and break down the "birth process" of a high-quality water-based epoxy colored sand floor.   1. Pre-construction Preparation: Three Essential "Surface Inspections"   Flatness Test: Measure with a 2-meter ruler, with an error of ≤3mm. If the surface exceeds the standard, level it with cement mortar (5-10mm thickness) and allow it to dry for 7 days before applying.   Moisture Content Test: The surface moisture content must be ≤8% (this can be checked with a hygrometer). Damp surfaces (such as basements) require a water-based moisture-proof primer to be applied and allowed to sit for 24 hours. Cleanliness: Remove dust, oil, and old coatings from the floor. Oil stains can be removed with an alkaline cleaner (such as dishwashing liquid mixed with water). Stubborn stains should be removed with sandpaper.   2. Core Construction Steps: 6 Steps to a "Textured Floor"   Step 1: Apply Water-Based Primer (1 Day)   Use the matching water-based epoxy primer and apply one even coat to enhance adhesion and prevent delamination later. Note: The primer should be diluted 10%-15% with water (as per the product instructions) and allowed to dry thoroughly for 24 hours after application.   Step 2: Repair Substrate Defects (0.5-1 Day)   Mix "water-based epoxy putty" and fine sand to make a patching paste. Fill cracks (<2mm) and holes in the floor. Once dry, sand with 120-grit sandpaper to smooth the surface.   
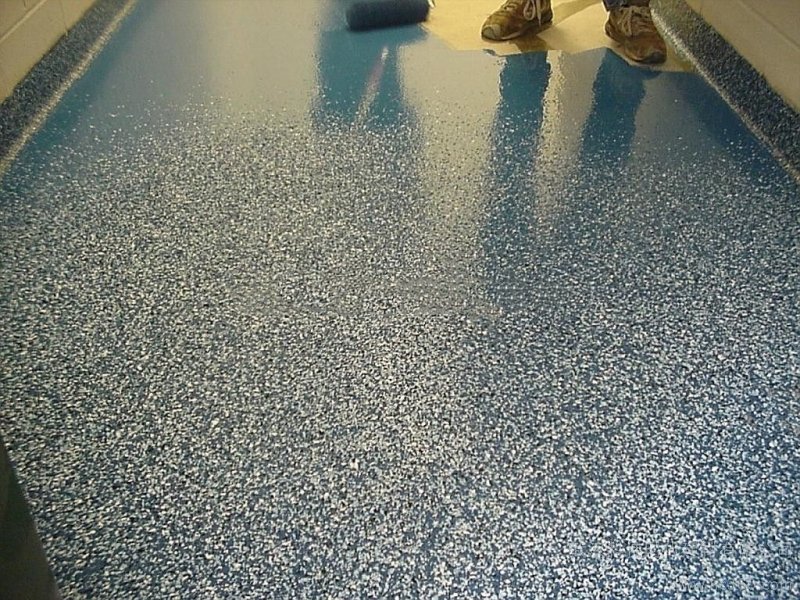
Step 3: Apply the Middle Sand Layer (1 day)   Mix the water-based epoxy sand base material and the curing agent in the correct ratio (usually 1:1). Stir thoroughly and apply with a toothed scraper (the number of teeth depends on the sand particle size) to a thickness of 1-2mm, ensuring even distribution of the sand.   Step 4: Finishing (1-2 hours after finishing)   When the middle sand layer is semi-dry (not sticky to the touch), use a stainless steel spatula to gently finish it, avoiding any damage to the sand particles and removing scraper marks.   Step 5: Apply a Water-Based Topcoat (1 day)   When the middle sand layer is completely dry (24-48 hours), apply one or two coats of water-based epoxy topcoat (matte or semi-matte finish available) to improve surface wear resistance and gloss, leaving 12 hours between coats. Step 6: Curing and Maintenance (7 Days)   After construction, seal the site to prevent foot traffic and heavy objects from rolling over it. Allow the surface to fully cure for 7 days before normal use (avoid water washing for the first 3 days).   3. Acceptance Criteria: Four Tips for Determining Construction Compliance   
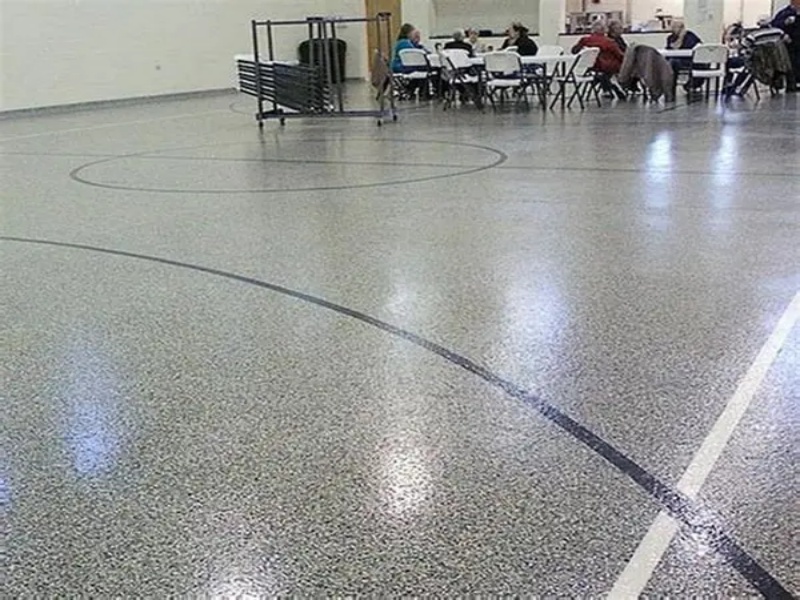
Appearance: The colored sand particles are evenly distributed, with no noticeable color difference, bubbles, or sagging. The edges (corners, door frames) are straight and neat.   Texture: Touching the surface reveals distinct, non-irritating particles, and a smooth surface with no bumps (≤0.5mm tolerance allowed).   Performance: Scratch the surface with a key, no noticeable scratches. Sprinkle a small amount of water and let it sit for 24 hours, and no wrinkles or discoloration.   Environmental: After curing, a close-up sniff reveals no odor (including resin), meeting the basic "install and move-in ready" requirements.
    ЧИТАТЬ ДАЛЕЕ

оставить сообщение

оставить сообщение
Если вы заинтересованы в нашей продукции и хотите узнать более подробную информацию, пожалуйста, оставьте сообщение здесь, мы ответим вам, как только сможем.
представлять на рассмотрение

Дом

Продукты

WhatsApp

Связаться с нами

Start a Conversation

Hi! Click one of our members below to chat on